
Adjusting your bike’s brakes should be a routine exercise. You perform regularly to ensure your bike is safe to ride.
Especially as bicycle brakes will always become less effective with time. This article will guide you through how to adjust bike brakes of all types.
Let’s get started.
Table of Contents
How To Adjust Different Types Of Brakes
Brakes are the parts of your bike that help stop or slow down and prevent any eventuality. One sign of a weak braking system is when brake levers become too near to the handlebars.
If you have a few tools, you do not need to access the local bike shop for servicing. It can just be a DIY affair in the comfort of your home. You do not require to have many skills to accomplish such a task.
However, you need to understand that different types of brakes require a unique approach.
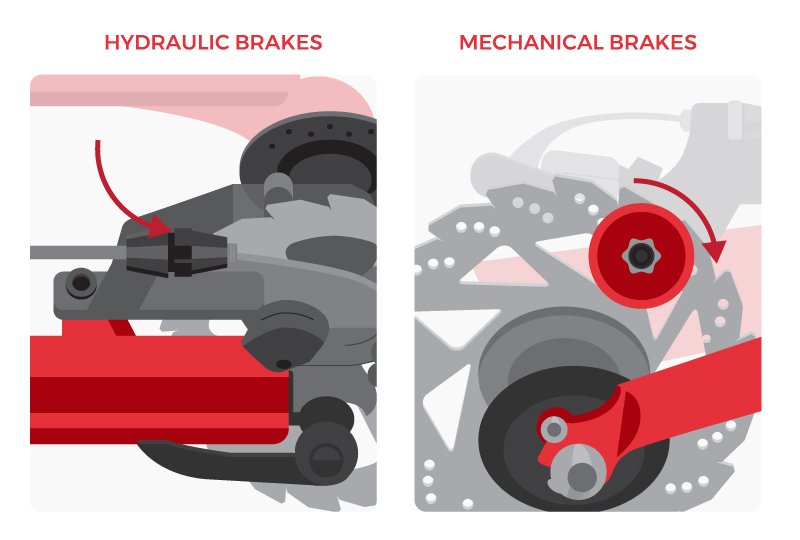
Disc Brakes
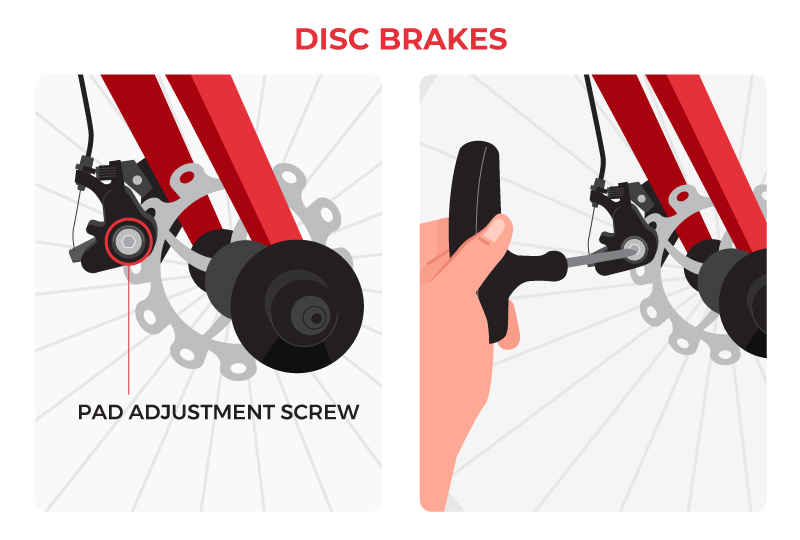
The disk brakes come in two forms being mechanical or hydraulic. The disk brakes are unique as they are not rimming brakes. The disk brakes work by applying pressure on the rotor. It would help if you had a compatible hub to put the brakes on the bike.
Before adjusting the dick brakes, you may need Allen wrenches.
Here are a few steps to follow:
- When the brakes are new, it is customary to hear some rubbing. As the sound goes off, it is an indicator that the brake pads are wearing into rotors.
- Begin to adjust by loosening the anchor bolt with the suitable Allen wrench. You will find this bolt in front of the brake, attached to a cable.
- Grasp the cable and tighten the anchor bolt firmly.
- Next, evaluate the brake pad clearance. It is vital to get a tight tolerance conveniently. You can achieve it by adjusting the inner brake pad as you twist the pad adjuster bolt. If unsure, then check the manual.
- Spin the wheel, and as you sense some rubbing on the rotor, adjust further.
- Squeeze the brake lever as you spin the wheel again until you hear the noise no more.
- Lastly, adjust the outer brake tolerance.
- The above steps work for rear and front brakes.
Caliper Brakes
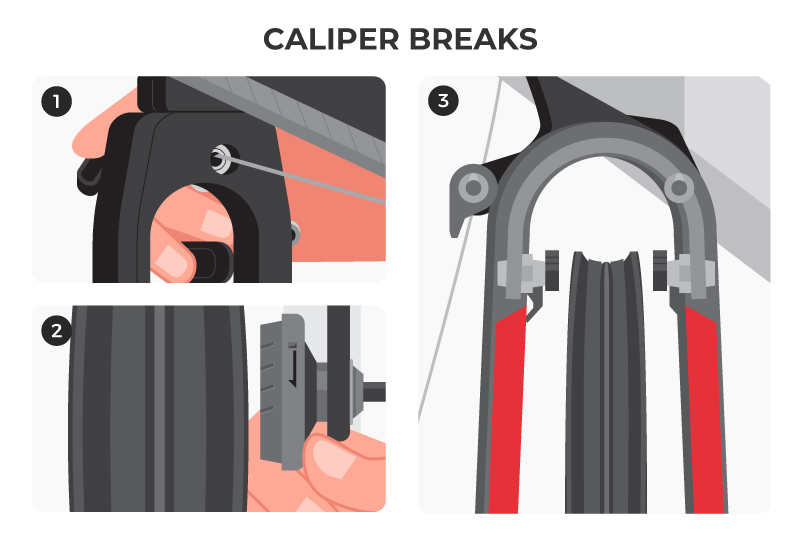
The process of adjusting the caliper brakes is simple. Ensure that the wheel is in the drop entirely through the opening and closing the quick release.
- Using a 4mm Allen wrench, begin the adjustments with the left extension.
- Using a 5mm Allen wrench, fasten the particular brake to the bike frame. Ensure that it is not too tight.
- Loosen the mounting screw as you set the brake pad’s bottom edge closely. Let the brake pad remain centered on the rim. Repeat the same procedure on the right pad.
- You can now test the brakes to evaluate how they work. For any adjustment, you can repeat the steps above.
Cantilever Brakes
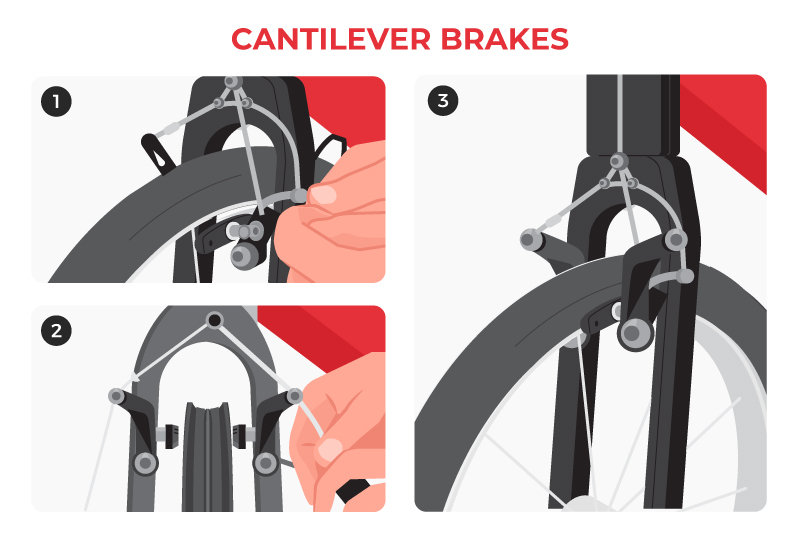
Cantilever brakes are powerful devices that are suitable when participating in cyclo-cross racing. It can serve the bike when riding on the light terrain while off-road. Such brakes apply pressure on the tire rim for effective braking. You can follow these steps during adjustment:
- Ensure that the sires used to control the brake pads have the same length.
- Maximize your time to perform minor adjustments, which is a bit challenging.
- Suppose the lever is difficult when pulling; consider replacing it.
The Tools To Help You
You need particular tools to fix different brake types. If you are fixing all brake types, you must have the following tools:
- The manual for your bike
- A set of Allen wrench (3mm, 4mm, 5mm)
- Phillips head screwdriver·
- Two 10mm socket wrenches
- Zip tie
- 3-Way Allen Tool (4mm, 5mm, 6mm)
Adjusting The Brake Pads
If you want to learn how to adjust bike brake pads:
- Ensure that you maintain brake pads routinely.
- Check on the brake pads and ensure that they are in the right form.
- Suppose they are not in good shape, you must install new ones.
The good news is the brake pads can be reusable. You can establish their worth by squeezing the brake handles. The right brake pad should work on the wheel’s center.
They will need some adjustments if they are working on the tire. Or else if they are lack proper alignment on the wheel’s rims.
Here are the steps to use to make some adjustments:
- You need a 5mm Allen wrench, ring spanner, and pliers.
- You can change the position of the brake pad by loosening the brake pad nut.
- Use the right wrench to fix the cable fixing bolt.
- Loosen the nut as you turn the wrench clockwise until the brake pad turns.
- Reposition the brake pad until it is on the same plane as the rim.
- Tighten the nut snugly as you test the adjustment thanks to the brake lever.
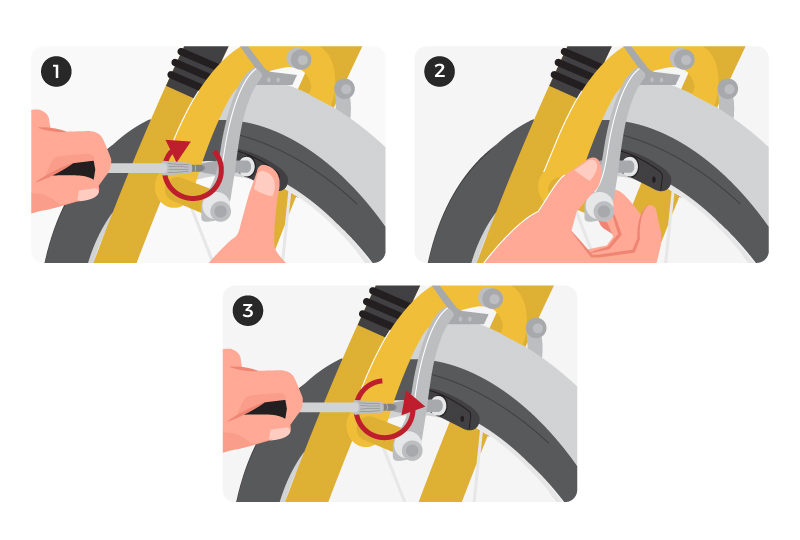
You can adjust the centering of brakes on the rim by:
- Locating the brake’s tension screw.
- Determine the direction of moving the brake, which can be either left or right.
- Begin the adjustment using a brake arm.
- Use the Phillips screwdriver to loosen or tighten the screw.
- Rotate the screwdriver as you test the adjustment.
- If you adjust the pads properly, the brake arms move equally.
Adjusting The Brake Cables
The type of resistance from the brake handle lever will determine how the user can push the brakes. But that is not all. You can optimize it by adjusting the cables that you will involve in connecting to the brakes.
You can achieve by tuning the length of the cable for it to match your needs. Suppose you experience much resistance, then it becomes difficult to push down to them. In case the resistance is small, the braking system becomes too responsive.
Before you perform the adjustment procedure, you should have the Allen wrench. Such tools should be in the range of 3mm, 4mm, and 5mm. After that, locate the brake cable fixing bolt and begin to loosen the bolt. The arrangement will either loosen or tighten the cable.
Before you complete the exercise, you should test the brake handles using the brakes. As such, you will determine if the settings suit your preferences. If you find it to the level that matches your needs, you can loosen or tighten further until you achieve the optimum length.
After completing the brake cable adjustment, you can now screw the brake cable fixing bolt, and you will be good to go. Putting the cable at the right length will enhance your bike’s performance since the rider enjoys sound braking systems. The design assists the user in overcoming accidents and making emergency stops conveniently.
Otherwise, here are the simple steps to follow:
- You can pull each brake lever to test the cable’s tightness.
- Suppose the brake levers hit the handlebars, then the brake cables are too loose.
- Perform a minor brake adjustment by loosening the barrel adjusters
- Proceed by unscrewing the bolt that holds the brake cable found on the caliper.
- You can now tighten it by pulling the brake cable outward.
- Tighten the bolt that holds the thyme brake cable at the caliper.
- You can involve the Allen wrench to turn it clockwise at least 2 to 3 times.
- Lastly, tighten the barrel adjusters, which are on the handlebars.
Adjusting The Brake Lever

Before you begin to adjust the brake lever, you must have the following tools:
- 5mm Allen wrench
- 4mm or 6mm for a particular brand
Before you begin the exercise, determine the distance that the brake lever will travel. Suppose the brake lever moves less as you pull it, adjust the brake by pulling the cable via the brake cable fixing bolt.
In case you prefer the brake lever to move more as you pull it, adjust a little cable from the brake cable fixing bolt.
Steps to follow includes:
- Have the right wrench to handle the cable fixing bolt.
- Place the same wrench to be in contact with the bolt using one hand.
- You can hold the other end cable using another hand.
- Loosen the bolt to allow the brake arm to move across the cable freely.
- Let the wrench hold the bolt.
- Move the brake to either loosen or tighten it.
- Test the lever as you tighten the cable fixing bolt
- If the adjustment meets your expectations, then tighten the cable fixing bolt.
- Test the brake lever again to ensure it is to your preference.
- If you require minor adjustments to your cable, use the adjusting barrel found in most calipers.
- You can tighten the brake feel by screwing out the adjusting barrel counter-clockwise.
- You can loosen the brake feel by screwing in the adjusting barrel clockwise.
Don’t Forget To Hit The Brakes!
Brakes are vital components of your bike. They come in handy while riding downhill or while facing an obstacle. Well-calibrated brakes respond quickly, bringing your bike to an instant stop.
As a bike owner, you must check the brakes regularly. If you lack knowledge of how to adjust bike brakes, then seek a mechanic’s services. The professional will customize them to meet your needs.